Individual Customer
Individual customer UX/UI.
Design Guide
These are examples of screens you can include in your design flow. Each example contains information about the purpose of the screen. We also will share the dos and don'ts when designing each screen.
Below you can see the summary of the screens that will be presented on this page:
📑 Summary
- Create Account
- Upload Document Identification
- Quotation
- Create Recipient
- Create Outbound Transaction
- Create Bank Account
- Share Bank Details
- Create Inbound Transaction
Create Account
This is a registration flow that may be used if the partner wants to compare the information we request in FXaaS with the information that the partner may already request in their own registration flow.
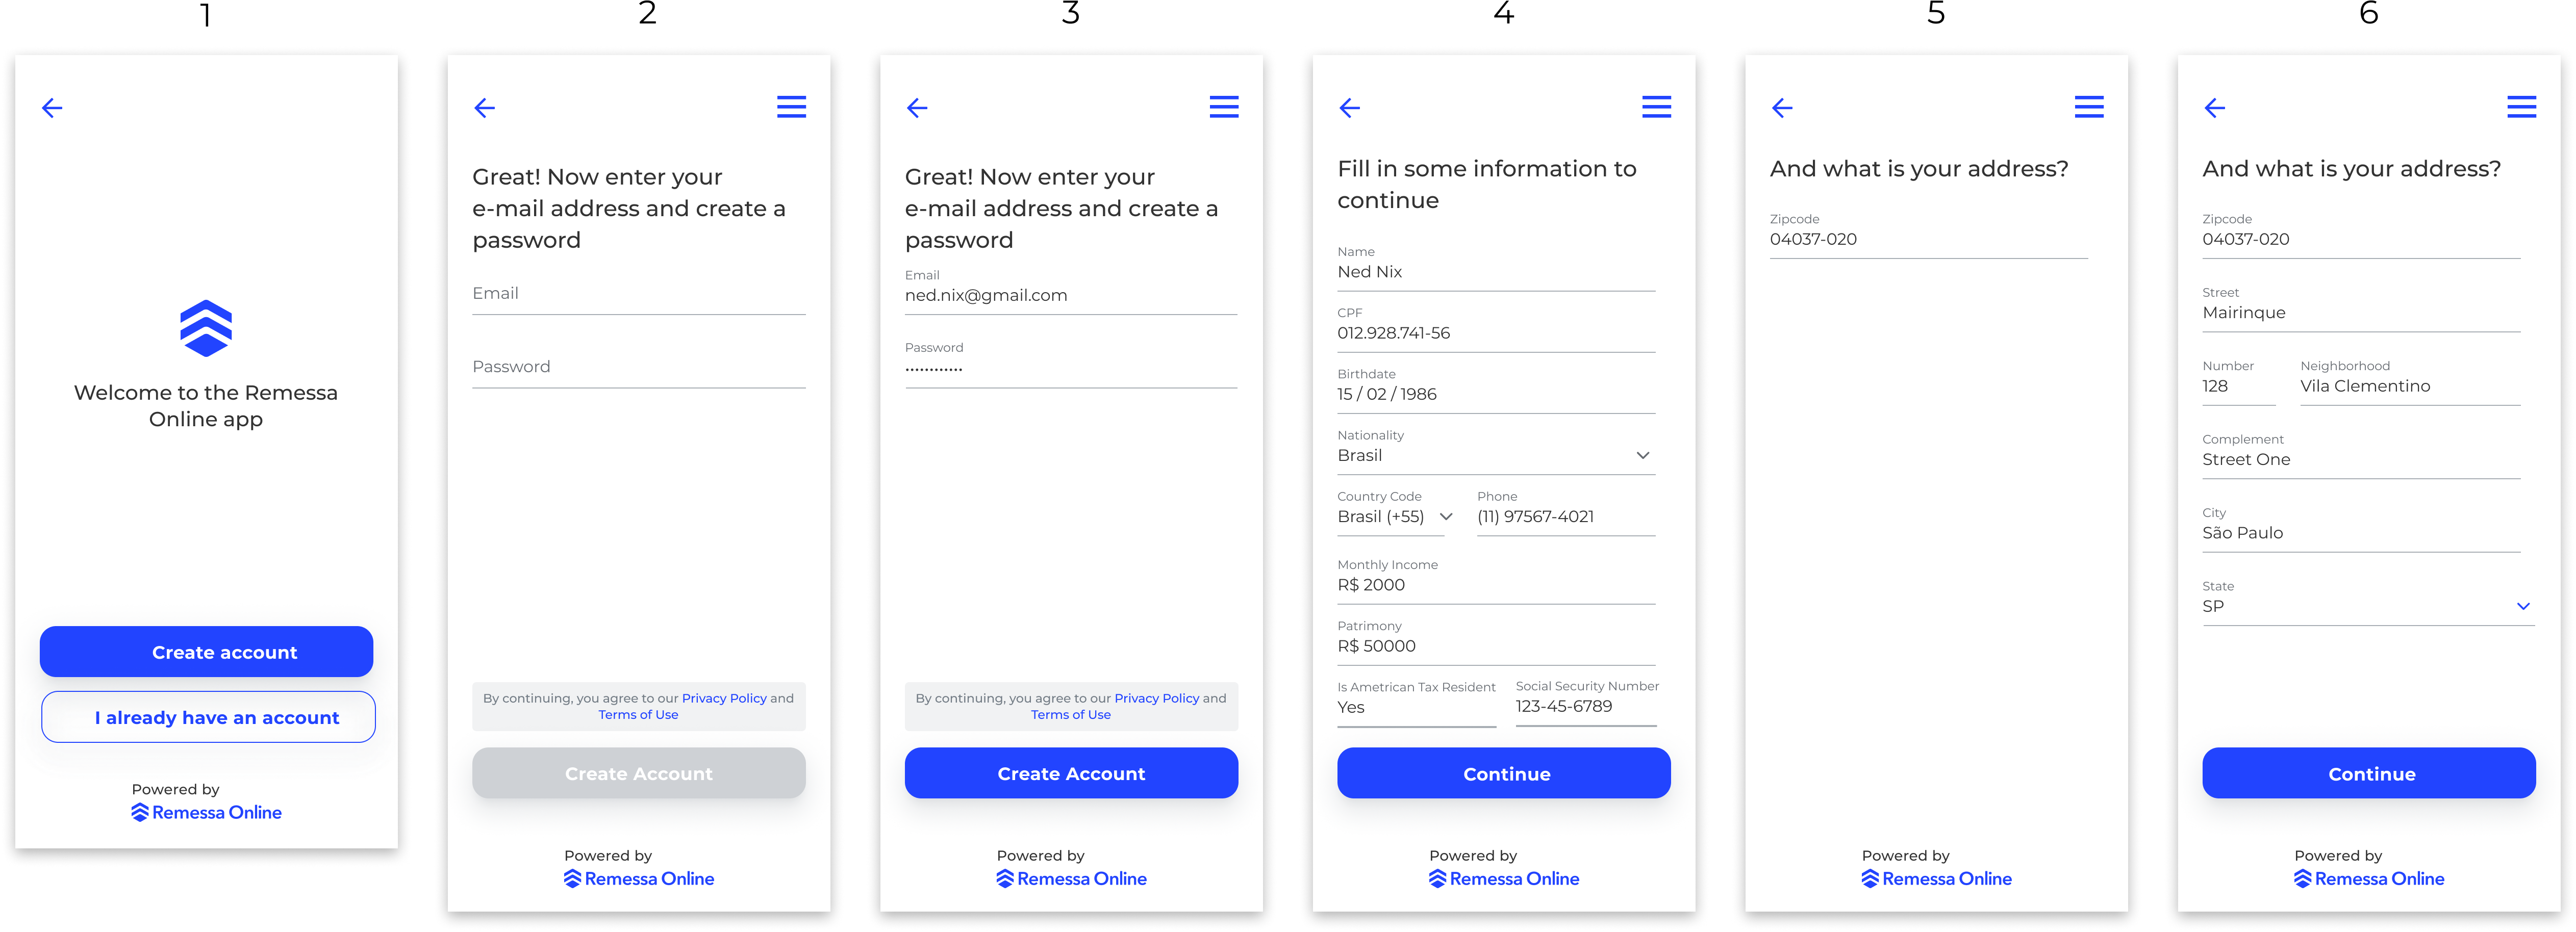
Create Account
Terms & Conditions and Privacy PolicyIt is the partner's responsibility to require the customer to agree to data sharing with Remessa Online. This needs to be done in order to have complicity with LGPD (General Personal Data Protection Law).
Not MandatoryIt is important to note that the "Create Account" and "Upload Identification Document" screens are not mandatory. If our partner already asks for this information during its journey, it will only be necessary for the partner to send this previously collected data on the backend.
Upload Identification Document
After the user is created, the registered client will be in the "AWAITING_DOCUMENT_UPLOAD" status, just waiting for the identification documentation to be sent.
The identification documents can be:
- RG (ID card)
- CNH (National Driver's License)
- RNE (National Registry of Foreigners)
- Passport (Brazilian Passport)
After uploading one of these documents, FXaaS performs a data enrichment and KYC of this customer. Once these processes are completed, the customer's status changes to "approved" and now the customer is able to create international transfers.
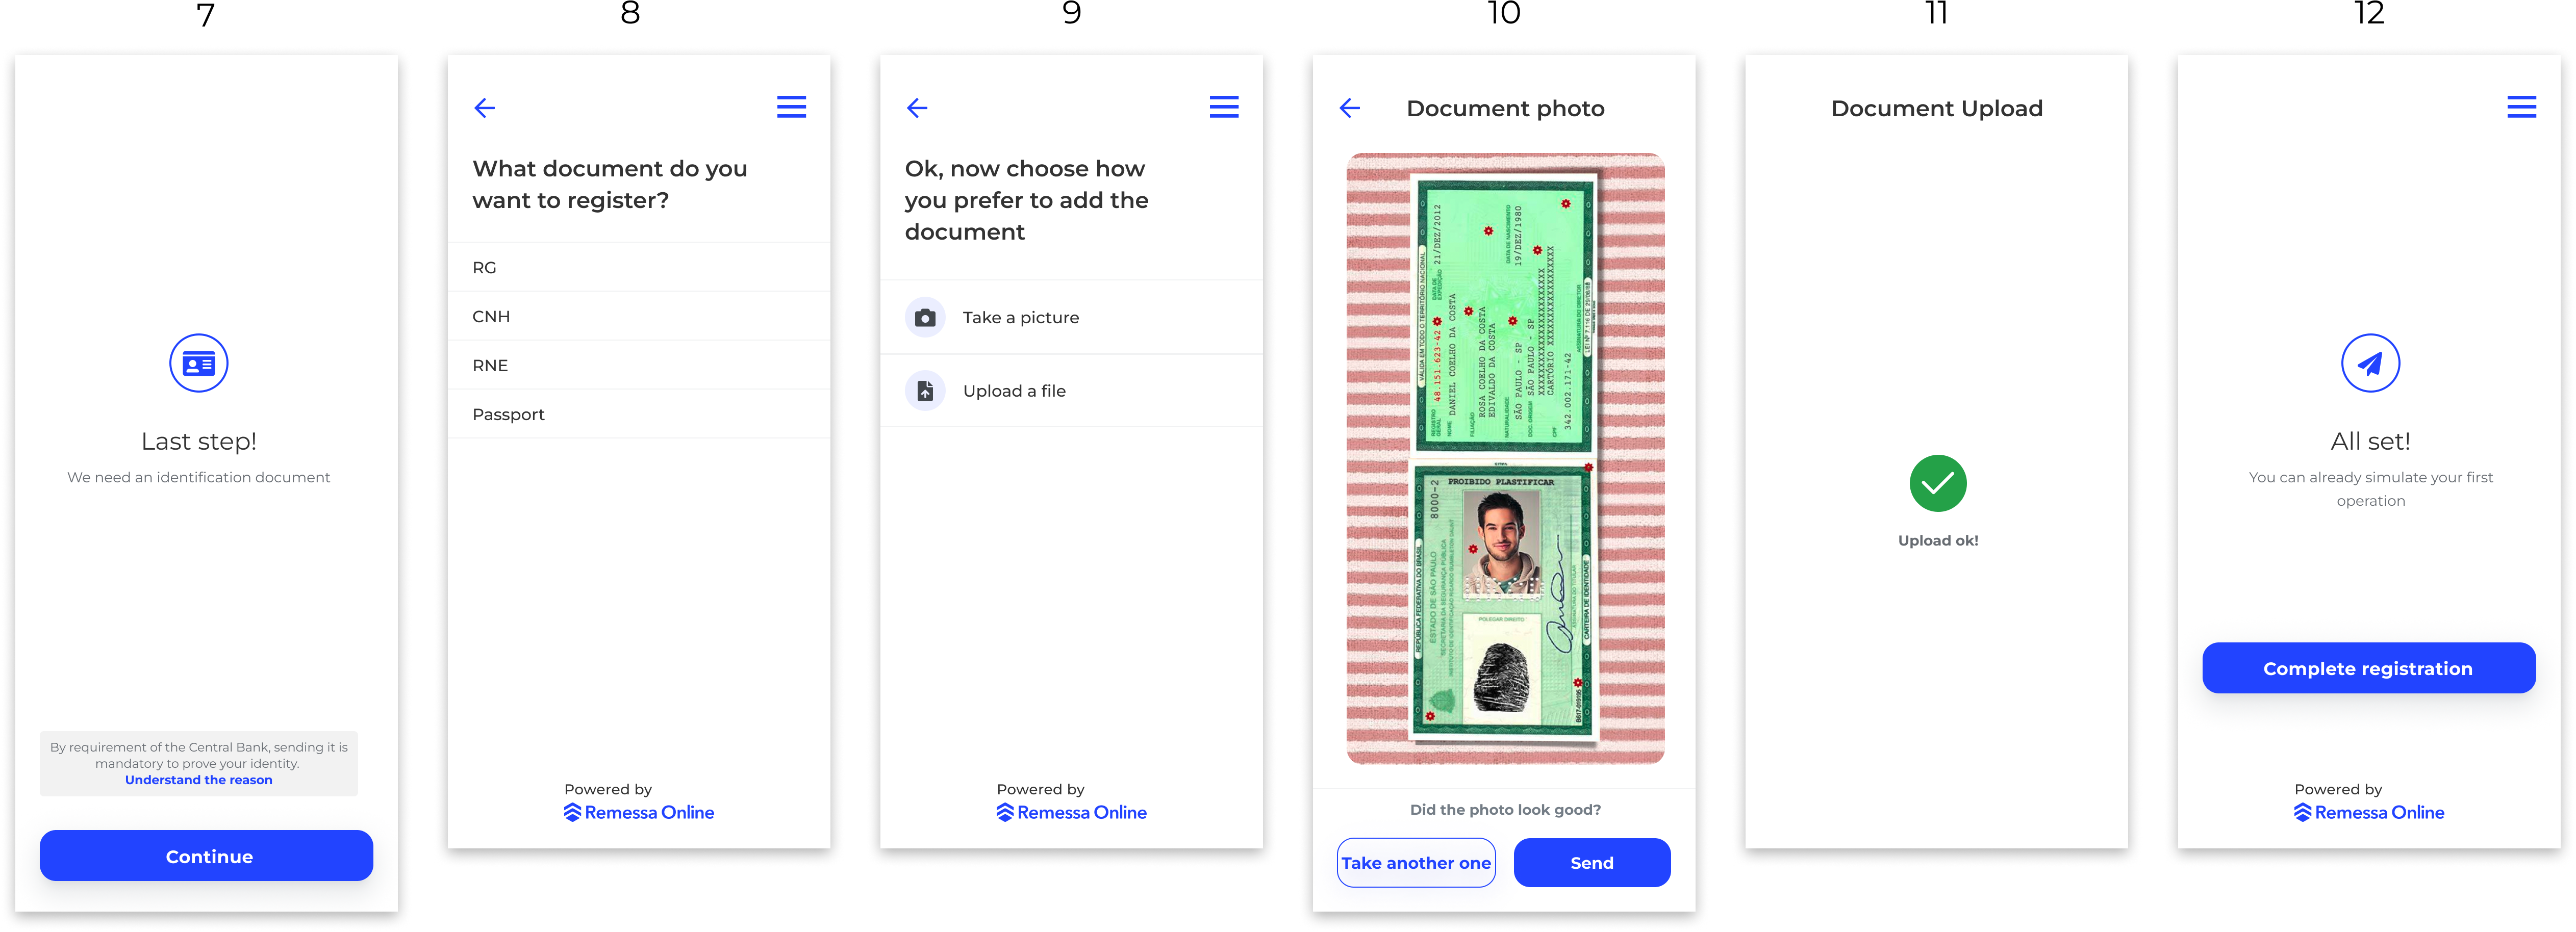
Upload Document Identification
Quotation
Now that the customer is able to create transactions, we can explore the quote and transaction modules.
Starting with the quote, we have an initial screen to create the transaction, and here the customer will be able to run a new simulation of the transaction. Now, the customer will be able to see all the data from the quotation by clicking on "understand the remittance calculation".
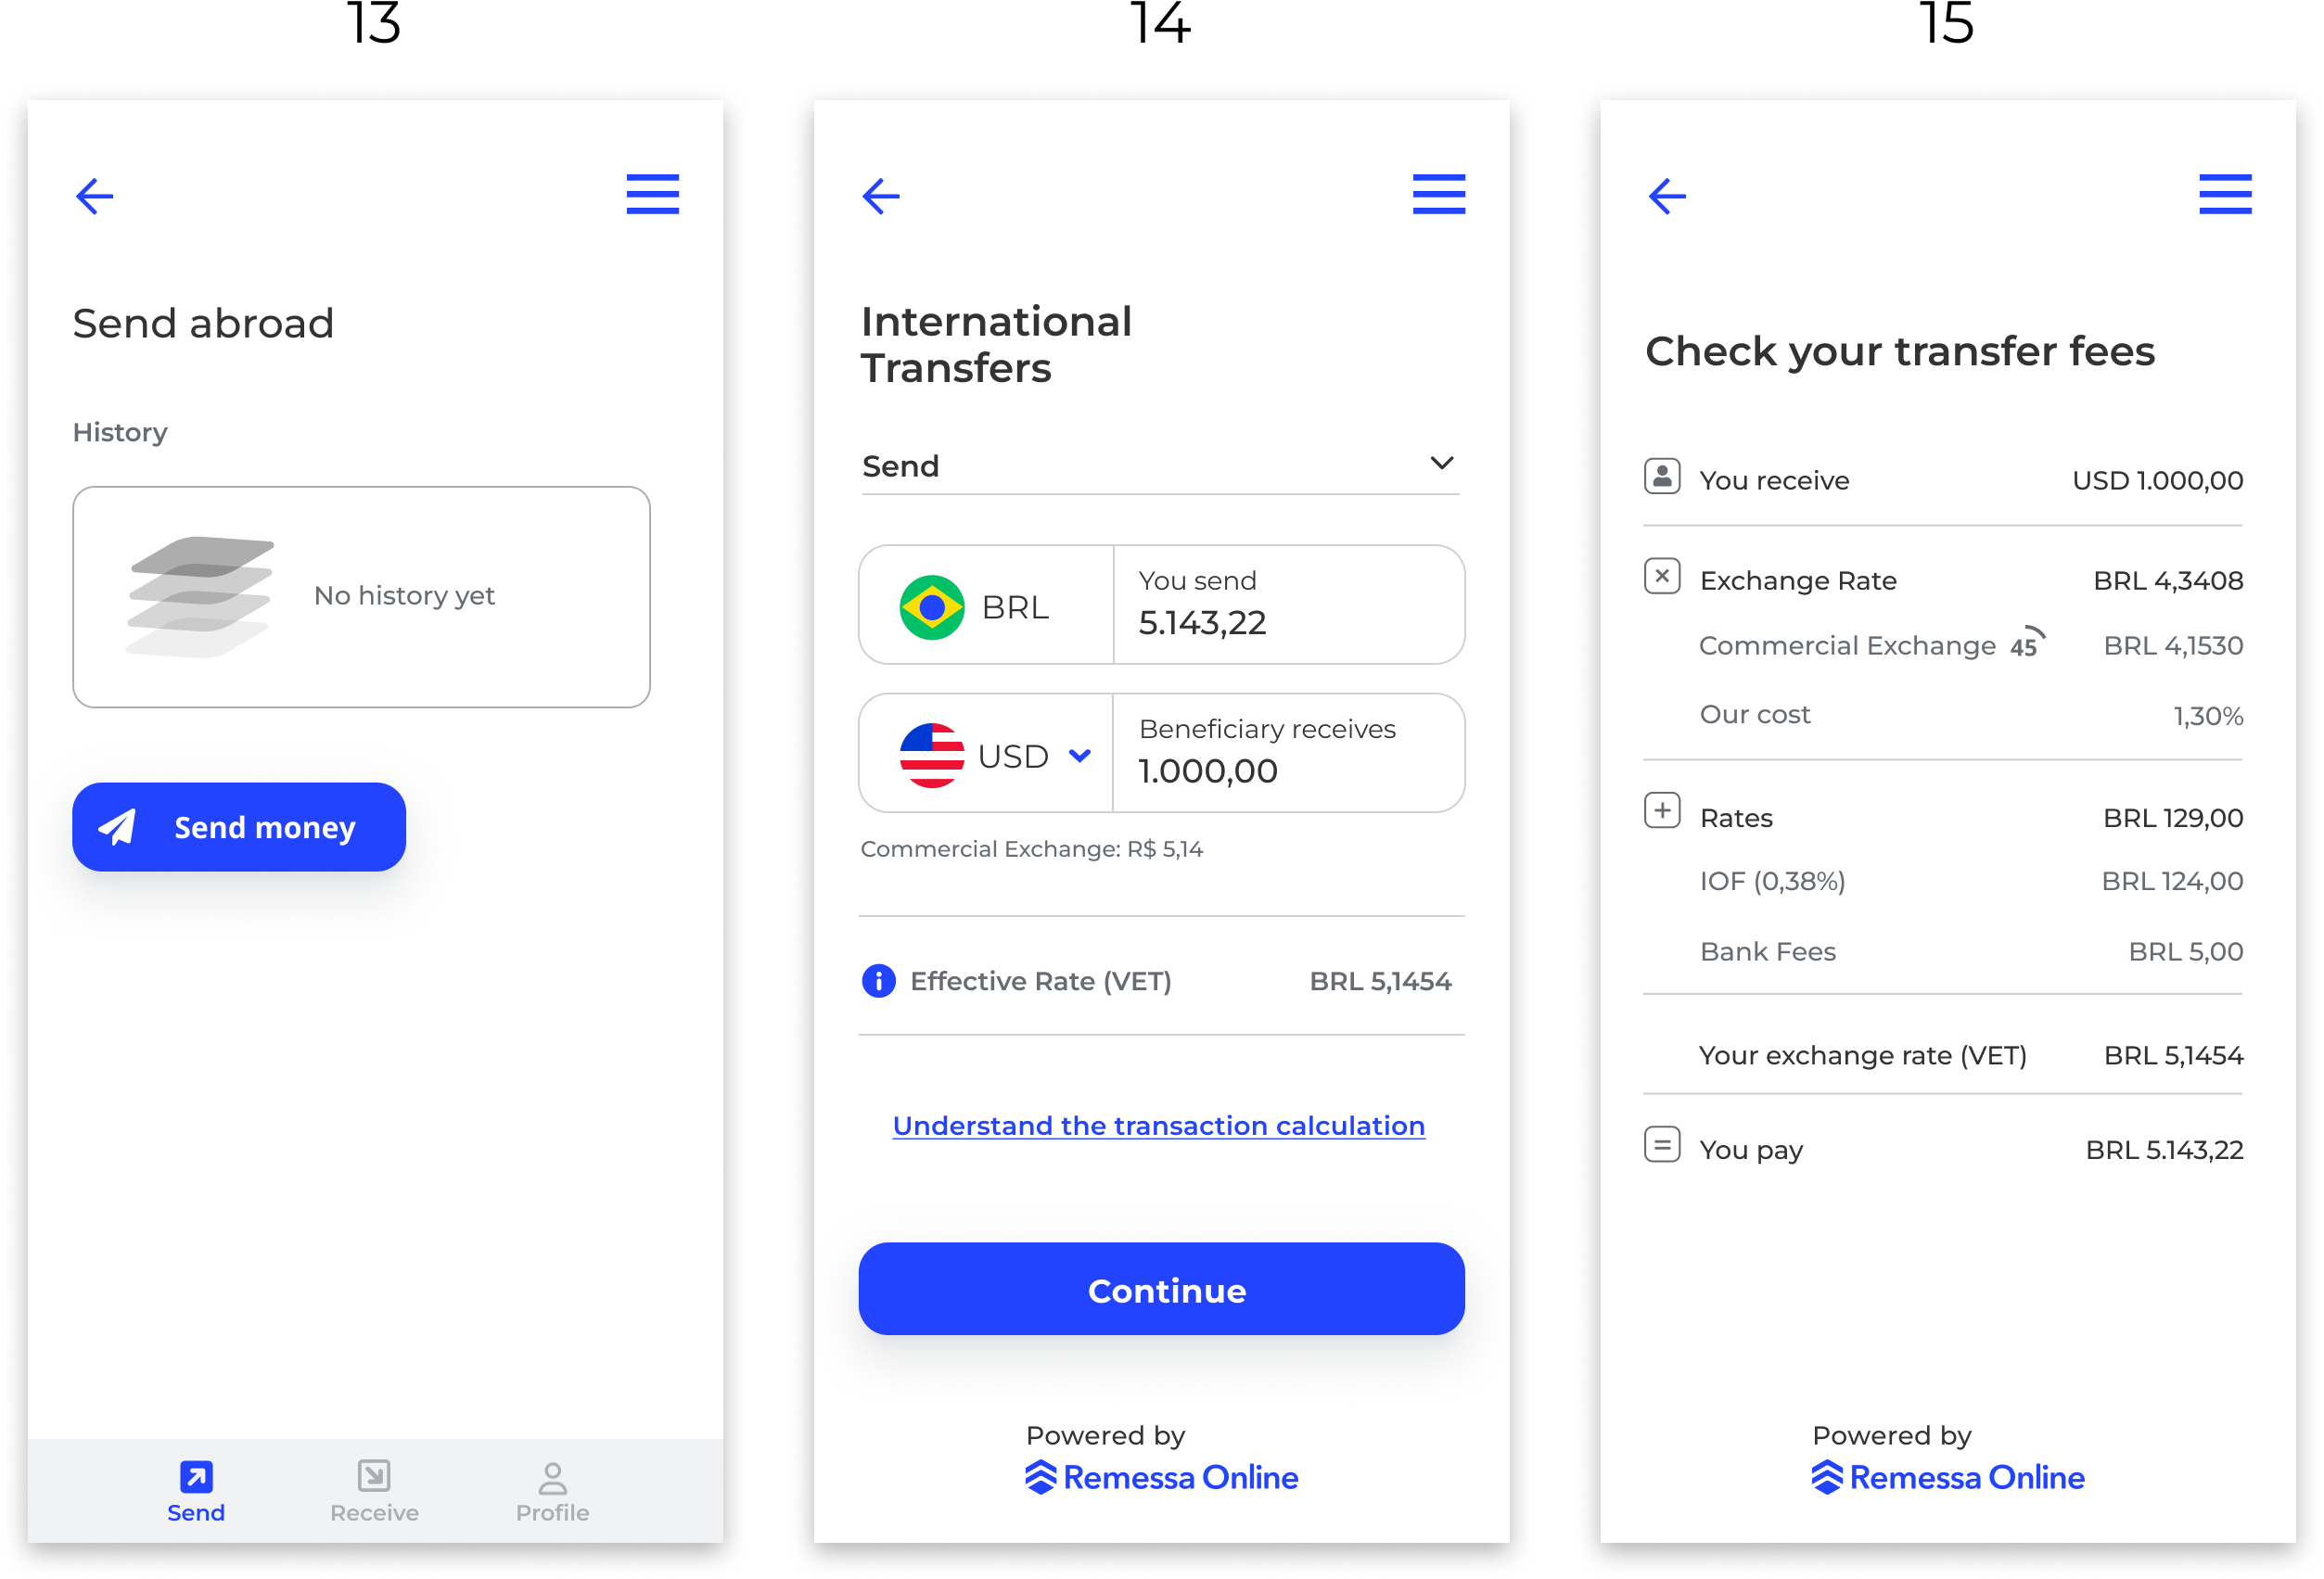
Quotation
Display feesOn the quotation screen, it is necessary to display all the information about fees, taxes, and duties to the customer. This is required by the Central Bank of Brazil (BACEN).
Create Recipient
Outbound Transaction OnlyThe recipient must be created only for OUTBOUND TRANSACTIONS.
The recipient is the person or company that will receive the money abroad. In this context, screen 16 is the selection of this entity (person or company). Then, on screen 17, we have the selection of the transaction's purpose. It is important to note that the purposes that should be displayed here are ONLY the purposes that are compatible with outbound transactions (OWN ACCOUNT ABROAD | FAMILY MAINTENANCE | INVESTMENTS).
Finally, for screen 18, the customer can create a new beneficiary or select one that has been previously created.
For screen 19 we need to get the country of the beneficiary. This field, along with the "outbound currency" field (screen 21), forms what we call the "corridor" of the transaction, which is precisely the cross between the country and currency.
These two fields inform the customer which parameters of the bank account should be informed of. We can see these fields still on screen 20, just below the "outbound currency" field.
After filling in the beneficiary's bank details, we proceed to the beneficiary's basic information on screen 21. By clicking "continue", the beneficiary creation process is finished.
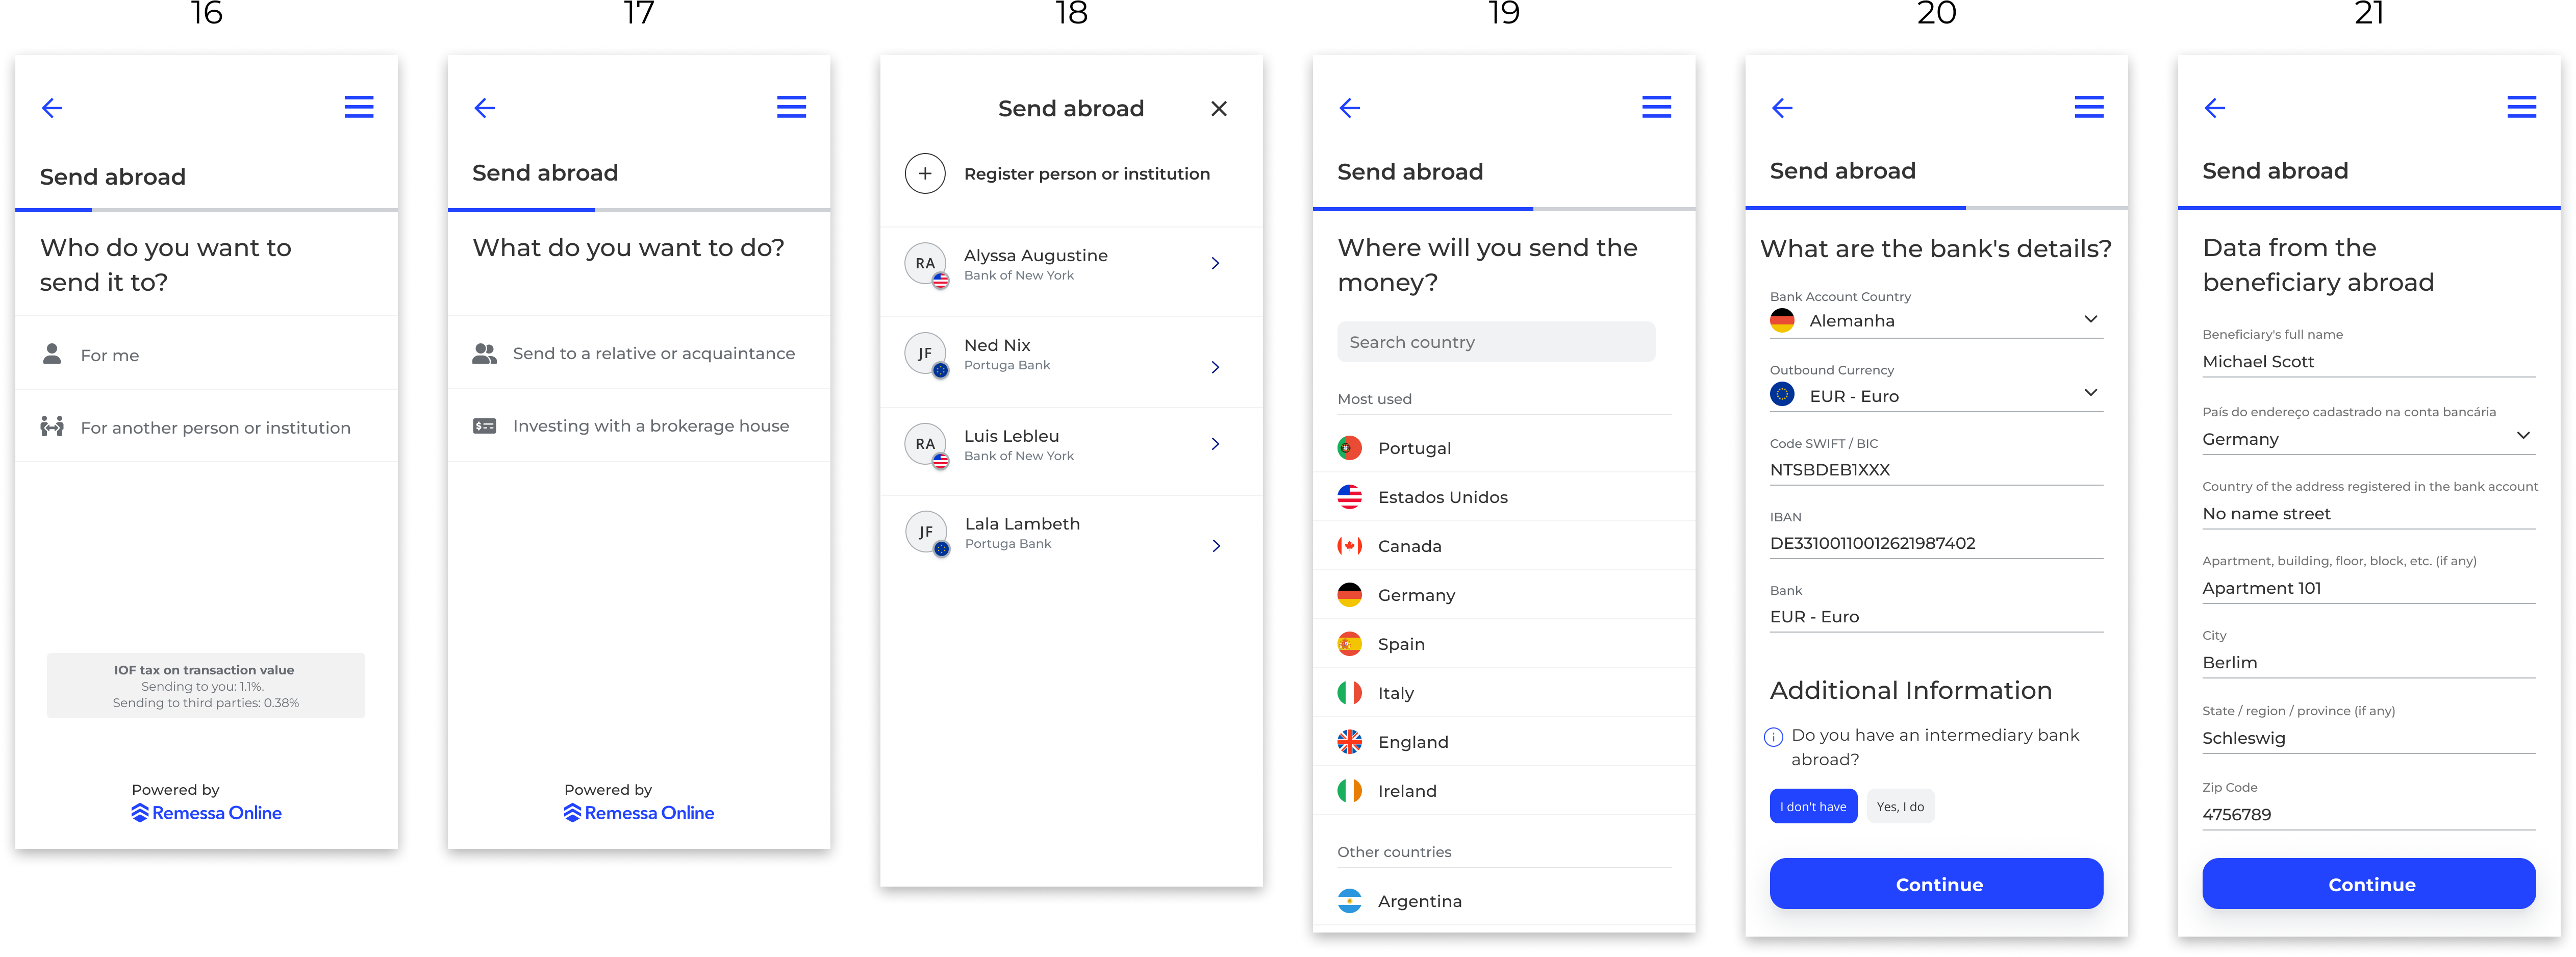
Create Recipient
Create Outbound Transaction
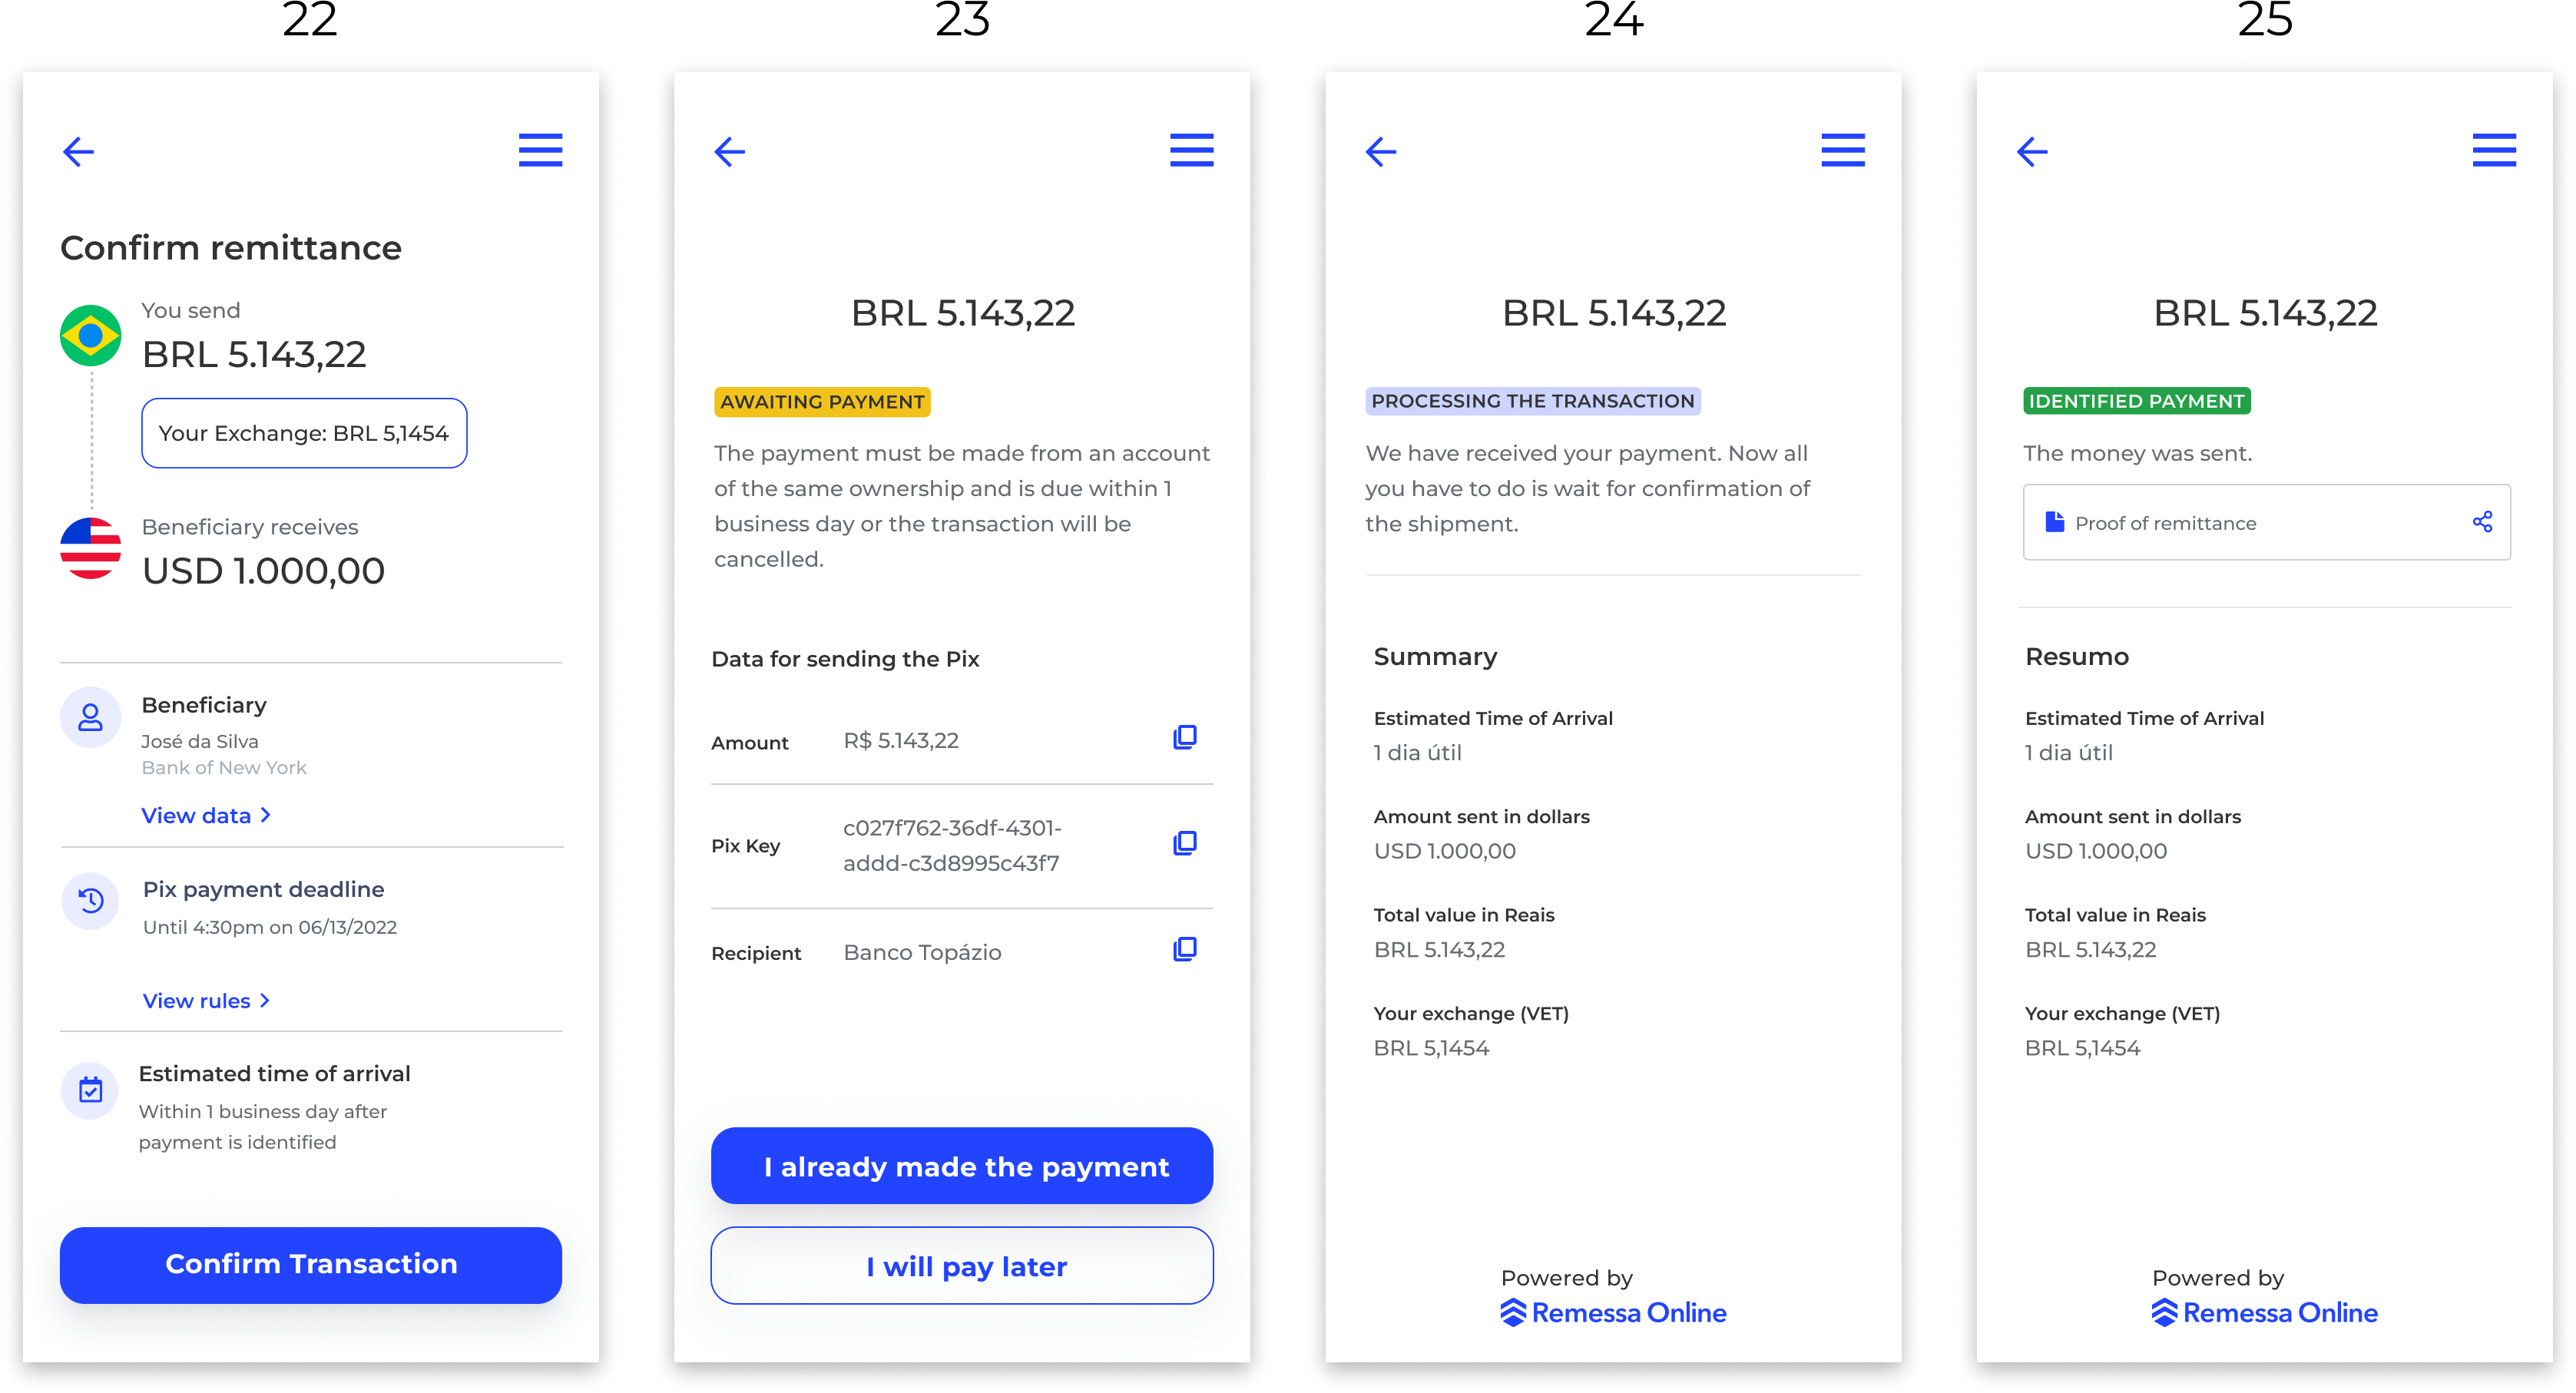
After creating the quote and creating or selecting an existing beneficiary, the last step is to confirm the transaction. Screen 22 shows us the converted amounts, the beneficiary (created or selected), the transfer payment deadline and method (PIX or TED), and the estimated arrival time of the money.
Then, screens 23, 24, and 25 correspond to the status of this transaction, respectively. Each status will be sent automatically via webhook so that our partners can notify their customers on time.
Create Transaction
Create Bank Account
Inbound Transaction OnlyThe bank account must be created only for INBOUND TRANSACTIONS.
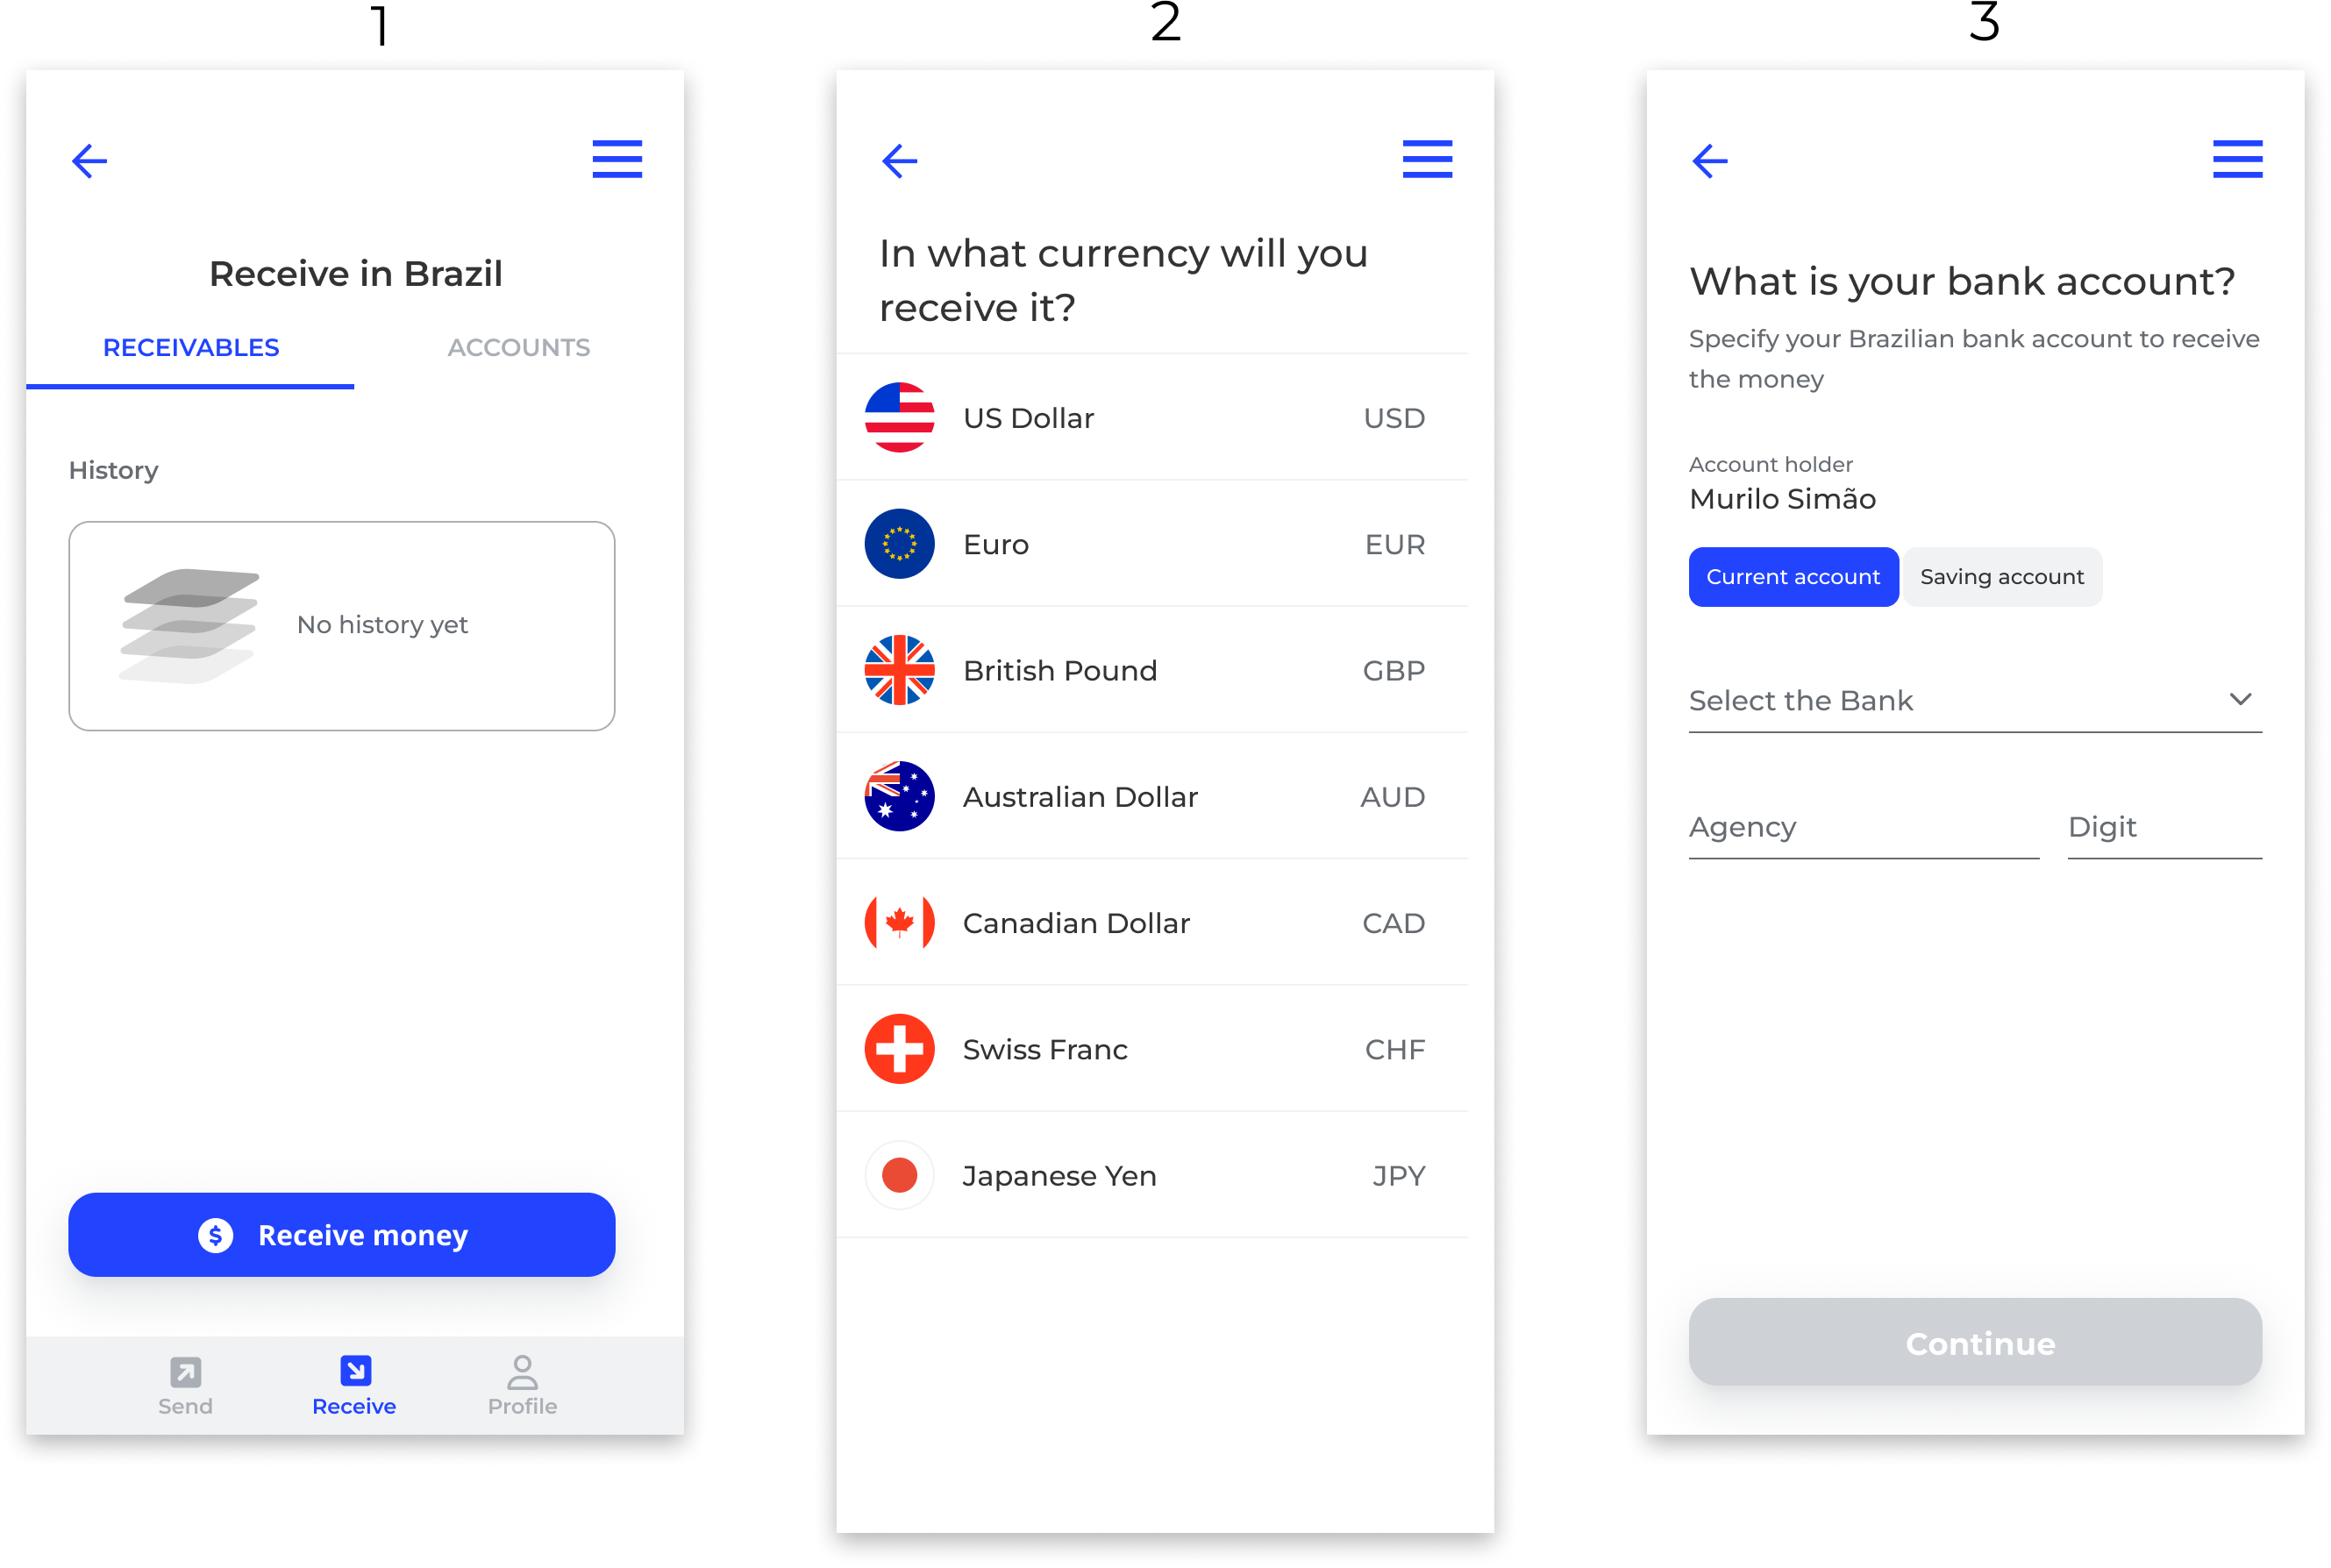
Before the customer actually creates the inbound transaction, the customer must create a Brazilian Bank Account that will be used to receive the amounts converted into Brazilian Reais. This bank account registration process can be seen on the screens below.
Create Bank Account
Share Bank Details
Inbound Transaction OnlySharing bank details is only necessary for INBOUND TRANSACTIONS.
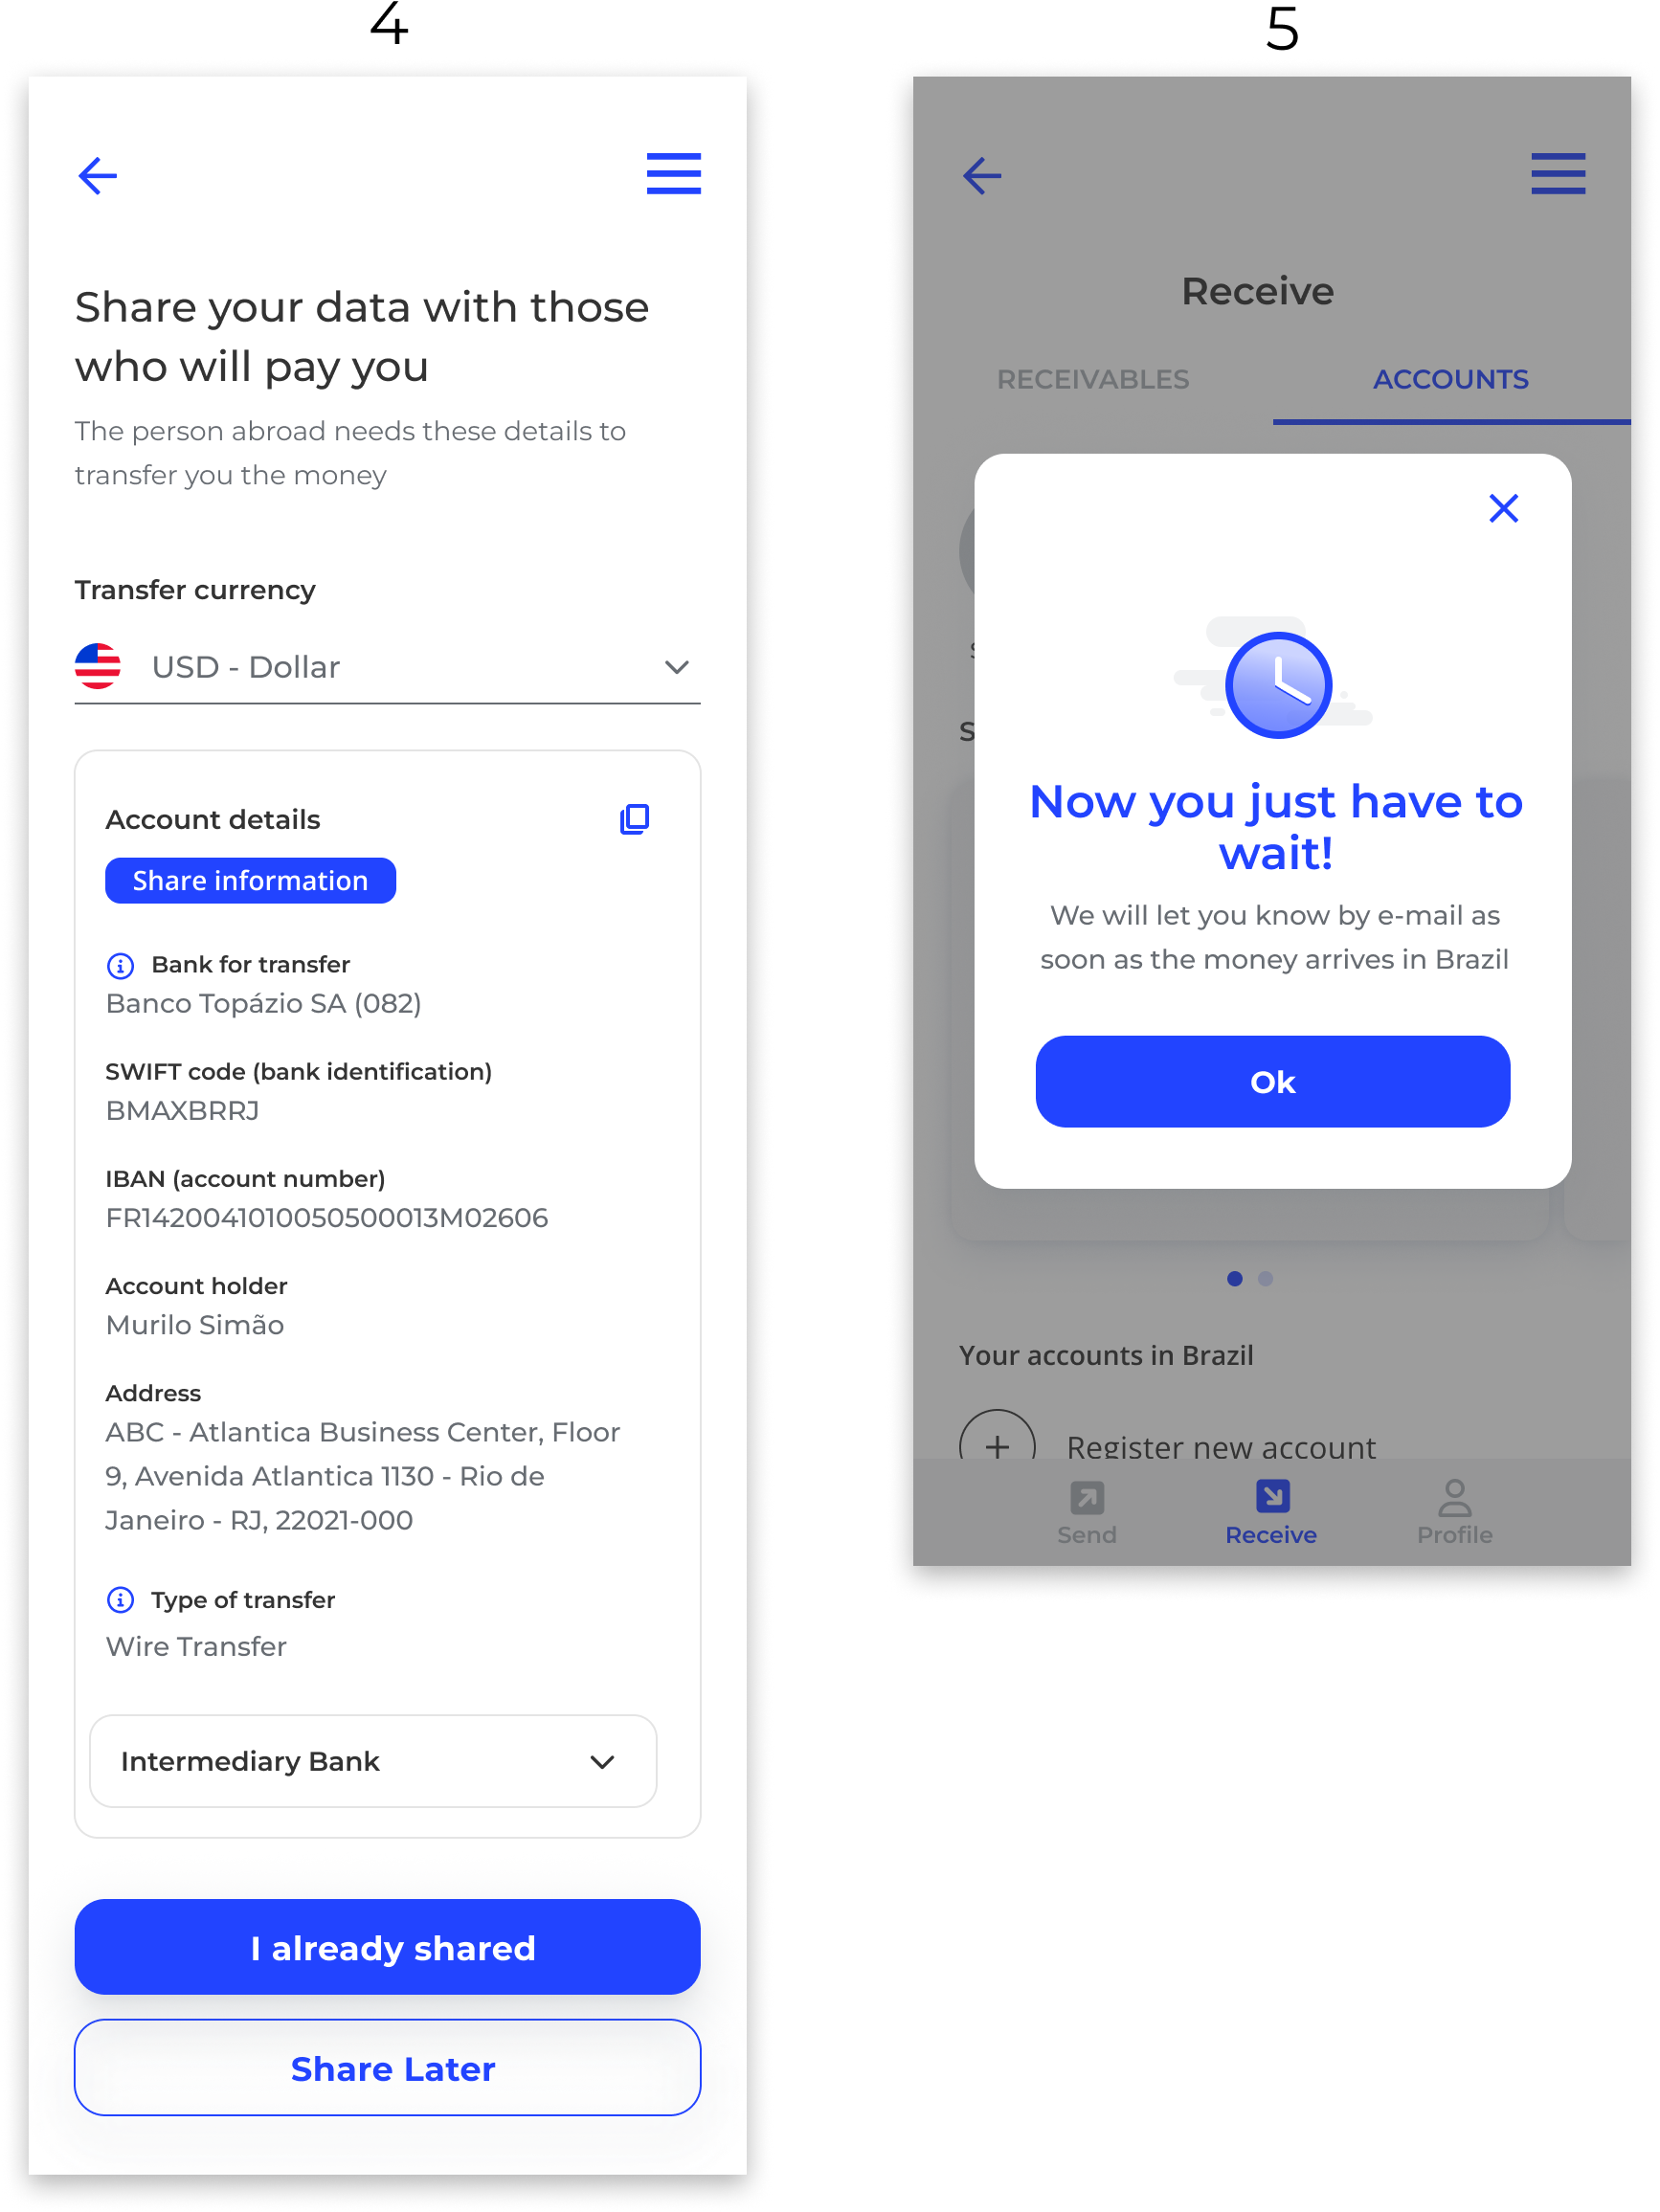
At this point, the customer still did not create the inbound transaction. Before this can happen, the customer needs to share his data with the remitter so that the remitter can make the transfer to the customer. These account details that need to be shared are NOT the bank account registered on screen 3. Check the differences:
-
Bank Account: This is the Brazilian bank account that must be registered to receive the money in Reais.
-
FXaaS Account: This is the account that must be shared with the sender to make the international transfer. It is this account from screen 5 that has the SWIFT, IBAN, etc.
Share Bank Details
Need for SharingIt is important to note that the client will only need to share the bank details in case it is a transfer between accounts of different ownership. If it is between accounts of the same ownership, the client will already know the details needed to make the payment.
Create Inbound Transaction
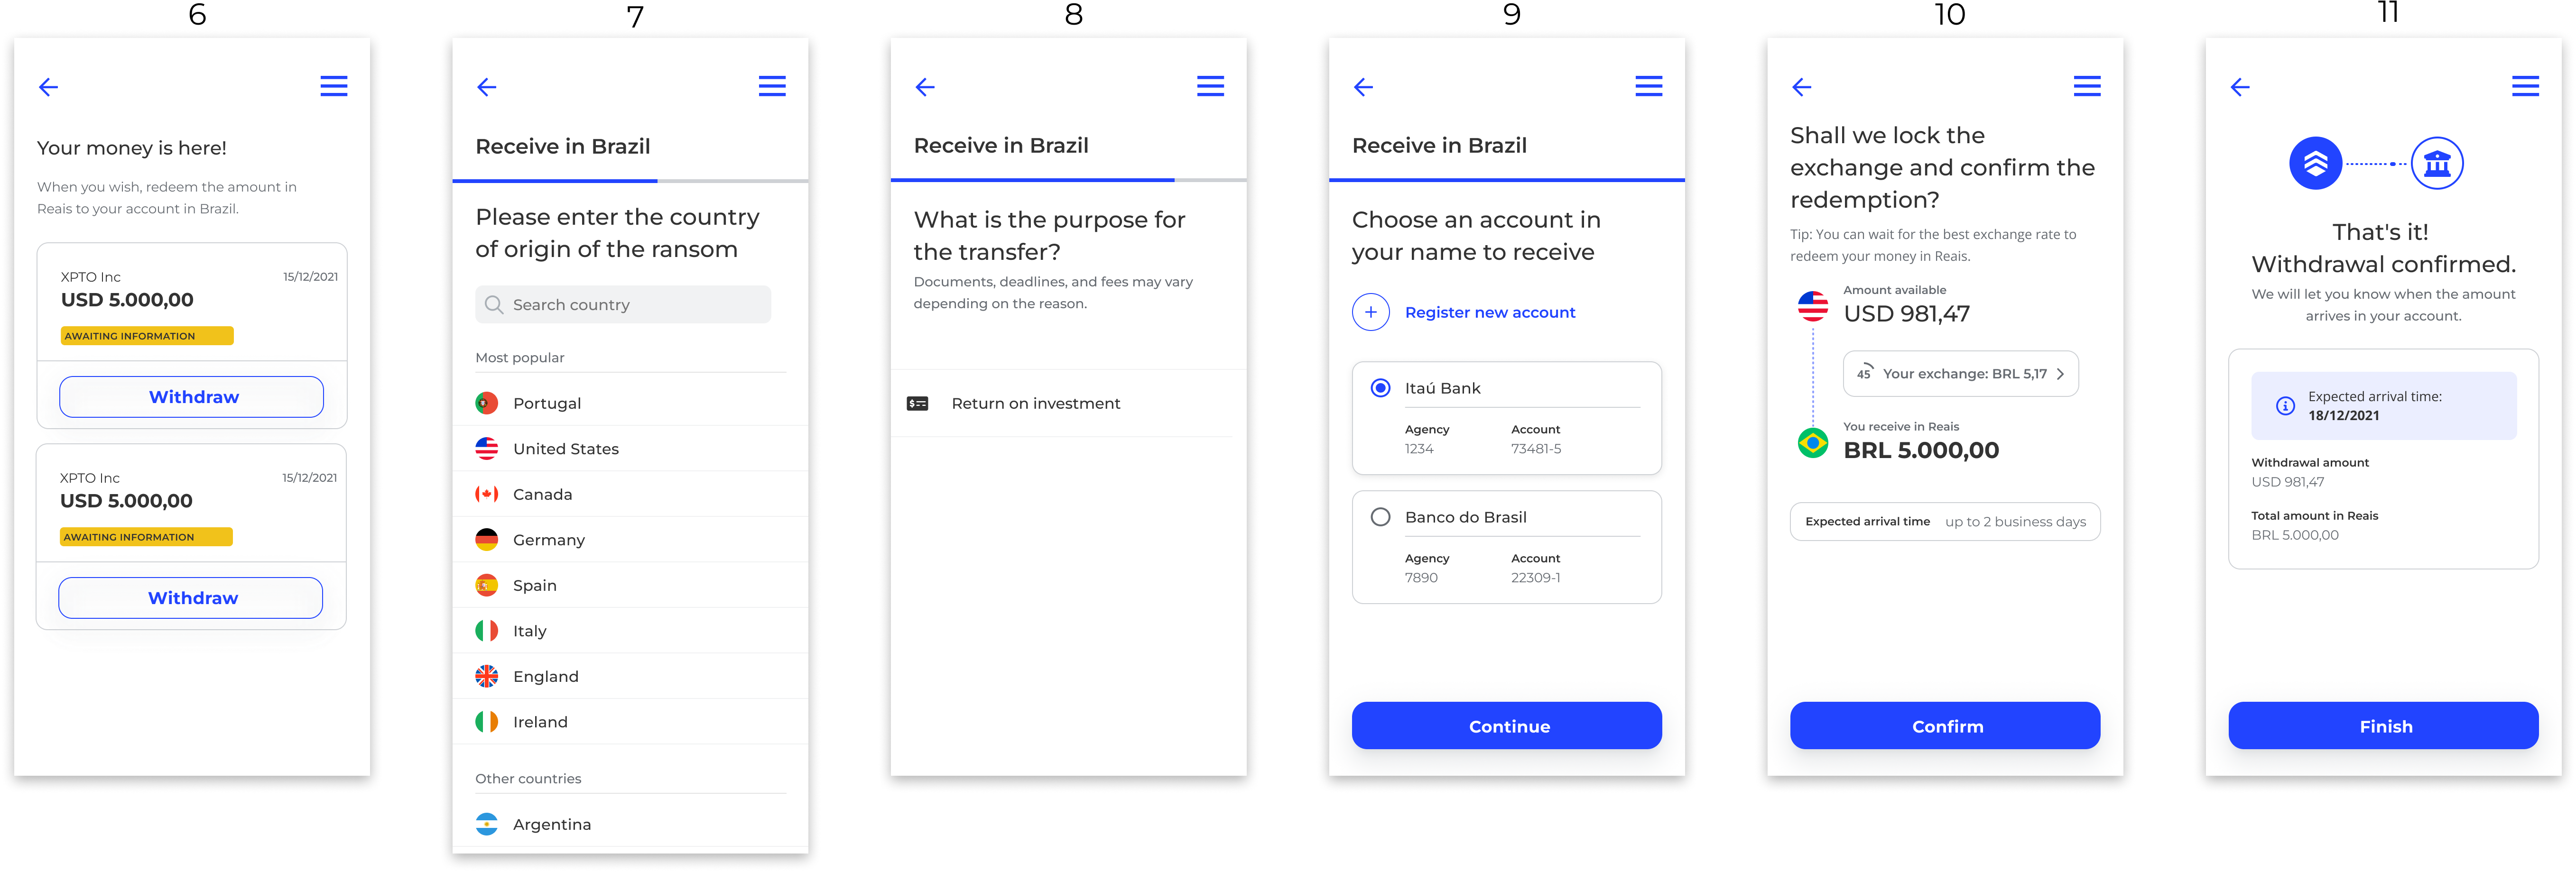
When the remitter sends the amount to the customer, the Remessa Online partner bank (Banco Topázio) identifies the transaction flow, and as soon as it checks that the payment has been made, it holds the money until the FXaaS customer on the partner platform decides to create the inbound transaction operation.
This first step can be exemplified in screen 6, where the partner should display the amount available for withdrawal. When the customer decides to make the withdrawal, the transaction creation process starts. The customer will select the purpose of the transaction (screen 8), select the bank account linked to the customer (screen 9), create the quotation (screen 10), and confirm the transaction.
Check Receivable and Create Inbound Transaction
Updated 9 months ago
